October 29th, 2009 by RamonaBatesMD in Better Health Network, Health Tips
1 Comment »

Flipping through the 1908 textbook, A Text-Book of Minor Surgery by Edward Milton Foote, MD I found at an antique store last month, I came across the section on ingrown toenails. The causes of ingrown toenails were much the same as one hundred years.
This is a condition in which the edge of the nail, usually of the great toe, by its too close contact with the flesh beneath causes irritation, ulceration, or suppuration. There has been much discussion as to whether the nail or the flesh is the more at fault. This discussion is without profit. It is much better to study the normal conditions, and see what can be done to restore them. Read more »
*This blog post was originally published at Suture for a Living*
October 3rd, 2009 by Toni Brayer, M.D. in Better Health Network, Health Tips
No Comments »

 This little girl accidentally got Super Glue onto her eyelid. She came to the doctor without pain and she was able to move the eyeball under the lid but could not open it.
Her doctor in Decatur, Ala gently irrigated the eye area with normal saline and applied antibiotic ointment and a gauze patch over the eye area but the lid remained stuck together. The next day he was able to gently pull the lid open.
If you should ever glue parts of your body together with Super Glue (cyanoacrylate), the treatment is easy. Acetone, the ingredient found in nail polish remover will dissolve Super Glue. A Q-tip with acetone, gently applied to the area, will dissolve the bond without damaging the skin. Don’t pull the skin apart, but gently roll or peel it.
If Super Glue gets in the eyeball, the eye protein will disassociate from it over time. A warm sodium bicarbonate solution eyewash will help remove the adhesive.
Photo/story credit: Consultant
*This blog post was originally published at EverythingHealth*
September 16th, 2009 by RamonaBatesMD in Better Health Network, Health Tips
No Comments »

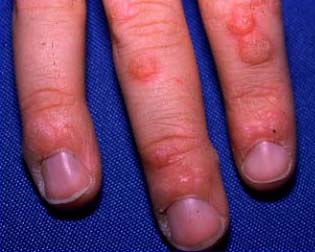
I’m sure I don’t see as many patients with common skin warts as my family practice or dermatology colleagues, but these patients still make it to my office. Sometimes it’s the primary complaint, sometimes it’s an afterthought. In reviewing the topic, it occurred to me that most patients don’t need to see any of us for this problem. They mostly need to accept the fact that the treatment takes TIME. So if you will persist, then you will often be successful without the expense of seeing a doctor. (photo credit)
Common warts (Verruca vulgaris) are caused by the human papillomavirus (HPV). Warts on the hands or feet do not carry the same clinical consequences of HPV infection in the genital area. It is estimated about 10% of children and adolescents have warts at any given time. As many as 22% of children will contract warts during childhood.
Common warts can occur anywhere on the body, but 70% occur on the hand. Often they will disappear on their own within a year. Even with treatment, warts can take up to a year to go away.
Before heading to the doctor, there are treatments you can try at home: salicylic acid or duct tape.
When using the 17% salicylic acid gel (one brand name: Compound W), it must be applied every day until the wart is gone. Only apply to the wart, not the skin around the wart. This treatment is enhanced by covering the wart with an occlusive water-proof band-aid or duct tape after applying the acid. It can also be enhanced by gently filing the wart with an emery board daily to remove the dead cells prior to applying the salicylic acid. Treatment can take weeks to months. Don’t give up early.
Duct Tape can take weeks or months to be effective. Apply the duct tape to the wart and keep it in place for six days. After removing the tape, soak the wart, and pare it down with a filing (emery) board. Repeat the above until the wart disappears. Once again, don’t give up early.
The two treatments (salicylic acid and duct tape) can be combined. Apply the salicylic acid liquid to the wart before bedtime. After letting it air dry for a minute or so, then apply the duct tape over the wart, completely covering the area. Remove the duct tape the following morning. Each time you remove the tape, you will be debriding some of the wart tissue. Repeat the application each night, until there is no remaining wart tissue. As with using only one treatment, don’t give up early.
If the above don’t work or you just don’t want to take the time, then you may wish to see your physician for removal. He can use cryotherapy to destroy the wart. This method may involve repeated treatment over several weeks. You can do the following to “get the wart ready for removal” and make the cryotherapy more effective:
-
Every night for 2 weeks, clean the wart with soap and water and put 17% salicylic acid gel (one brand name: Compound W) on it.
-
After putting on the gel, cover the wart with a piece of 40% salicylic acid pad (one brand name: Mediplast). Cut the pad so that it is a little bit bigger than the wart. The pad has a sticky backing that will help it stay on the wart.
-
Leave the pad on the wart for 24 hours. If the area becomes very sore or red, stop using the gel and pad and call your doctor’s office.
-
After you take the pad off, clean the area with soap and water, put more gel on the wart and put on another pad. If you are very active during the day and the pad moves off the wart, you can leave the area uncovered during the day and only wear the pad at night.
If none of the above work, then your wart may need to be removed surgically. Remember the above all take time, so give them time to work. Even if the wart disappears with any of the above treatments, it may recur later.
Sources
Treatment of Warts; Medscape Article, May 27, 2005: W. Steven Pray, PhD, DPh; Joshua J. Pray, PharmD
What Can Be Done About a Hand Wart That Keeps Reappearing After Removal?; Medscape Article, May 31, 2007; Richard S. Ferri, PhD, ANP, ACRN, FAAN
Duct tape and moleskin equally effective in treating common warts; Medscape Article 2007; Barclay L.
Duct Tape More Effective than Cryotherapy for Warts; AAFP, Feb 1, 2003; Karl E. Miller, M.D.
*This blog post was originally published at Suture for a Living*
August 13th, 2009 by RamonaBatesMD in Better Health Network, Health Tips
2 Comments »

Finally! [H/T to Cleveland.com]
After surgery I am often asked, “When can I get back in the tanning bed?” I say something like, “I would rather you not use a tanning bed. You need to protect you new scar from the sun, that includes tanning beds, for at least 6 months.”
“But, if I cover up the scar, when can I get back in the tanning bed?” is the usual response.
I then counter with, “IF you feel you must, then yes cover the scars. Please, limit or reduce the time you spend in the tanning bed. I would rather you not use a tanning bed.”
Most see “no harm” in using a tanning bed. After all, it’s not like laying out in the sun for hours. Too many see tanning beds as a “safe” way to get a tan. It isn’t.
Experts at the International Agency for Research on Cancer in Lyon, the cancer arm of the World Health Organization, have published their analysis of 20 studies online in the medical journal Lancet Oncology. The analysis concludes the risk of skin cancer jumps by 75 percent when people start using tanning beds before age 30.
These same experts have moved tanning beds and ultraviolet radiation into the top cancer risk category, deeming both to be as deadly as arsenic and mustard gas. The new classification also puts them in the list of definite causes of cancer, alongside tobacco, the hepatitis B virus and chimney sweeping, among others.
I would not mind tanning bed extinction. Regular use increased the risk of melanoma. It is much better to have a “peaches and cream” complexion or to use self-tanning creams. Skin cancer is no fun.
Related posts:
Sun Protection (March 19, 2009)
Melanoma Review (February 25, 2008)
Skin Cancer—Melanoma (December 8, 2008)
Melanoma Skin Screening Is Important (April 29, 2009)
Skin Cancer — Basal Cell Carcinoma (December 3, 2008)
Skin Cancer – Squamous Cell Carcinoma (December 4, 2008)
Moles Should Not Be Treated by Lasers (July 27, 2009)
*This blog post was originally published at Suture for a Living*
July 27th, 2009 by Paul Auerbach, M.D. in Better Health Network, Health Tips
2 Comments »

 The following is a message that I received from a reader:
“Professor Auerbach – I am an avid reader of your blog ‘Medicine for the Outdoors.’ Your two posts about foot blisters are really interesting. In my hiking experience there is another foot related issue, that is the subungual hematoma in the toenail. I think it could be an interesting subject in one of your blog posts. Thank you very much for the attention.”
Well, it just so happens that I have been a sufferer myself, so I’m happy to write a bit about this. Subungual hematoma refers to blood under a toenail or fingernail. In the fingers, this usually occurs from a blow or pinch, such as catching a finger in a door or striking it with a hammer. In the foot, it is commonly caused by repetitive blows in a confined space, such as hiking in a boot with a toe-box that is too small and/or too stiff. The photo above is my foot after a 10 mile hike over rocky terrain in hiking shoes that didn’t fit quite right. They were broken in, but they weren’t sufficiently flexible for that type of hike. A couple of hours in, I knew I was in trouble because of the pain, but there was no turning back. No surprise, when I took off my sock, I saw the blue color and knew that eventually that particular toenail was a goner.
What can be done about this condition? When it first happens, applying an ice pack might relieve the pain. Certainly, you should trade out the poorly fitted shoes for ones that provide greater room and comfort. If possible, curtail hiking activities for a day or two, and let the situation settle, or the blood collection might increase.
When a fingertip is smashed between two objects, there is frequently a rapid blue discoloration of the fingernail, which is caused by a collection of blood underneath the nail. Pain from the pressure may be quite severe. If the pain is intolerable, it is necessary to create a small hole in the nail directly over the collection of blood, to allow the blood to drain and thus relieve the pressure. This can be done during the first 24 to 48 hours following the injury by heating a paper clip or similar-diameter metal wire to red-hot temperature in a flame (taking care not to burn your fingers while holding the other end of the wire; use a needle-nose pliers, if available) and quickly pressing it through the nail. Another technique is to drill a small hole in the nail by twirling a scalpel blade, sharp knife, or needle. As soon as the nail is penetrated, blood will spurt out, and the pain will be considerably lessened. Before and after the procedure, the finger should be washed carefully. If the procedure was not performed under sterile conditions, administer an antibiotic (such as dicloxacillin, erythromycin or cephalexin) for 3 days.
In the case of my toe (above), the pain subsided with a day’s rest from hiking, so there was no benefit to be obtained by draining the blood. A new nail grew in underneath the one shown in the picture, with the entire process taking a full nine months from injury to nail replacement.
This post, Blood Under The Nail – What To Do, was originally published on
Healthine.com by Paul Auerbach, M.D..


